Sunday, May 31, 2009

Perfect Roast Chicken with Tarragon, Garlic and Lemon Update from France

I have made this recipe countless times, varying only the herbs. For variety, I use fresh rosemary or 1/2 t. anise seeds.

The high fast heat and olive oil guarantees a very brown crispy skin and juicy breast meat. If any pieces are not quite cooked enough, cook for 2 minutes in the microwave. Cooking in the oven 5 or 10 minutes longer dries out the meat. Your kitchen will smell wonderful and guests will gasp.

Perfect Roast Chicken with Tarragon, Garlic and Lemon
Ingredients:
1 4-5 lb chicken
extra virgin olive oil
salt and pepper
1/2 lemon
4 cloves garlic
bunch fresh tarragon
Instructions:
Take the chicken out of the frig 30-60 minutes ahead to bring it to room temperature.
Preheat the oven to 45o degrees F. for at least 10 minutes.
Place the rack in the middle of the oven.
Rinse the chicken inside and out, remove any string and place in a small roasting pan lined with foil
Drizzle olive oil over the chicken and season the outside with sea salt and freshly ground pepper.
In the cavity, place:
finely sliced lemon
garlic cloves, cut in half
tarragon
Place the roasting pan in the oven without a cover, leaving the oven door open for as short a time as possible.
Roast for one hour. Do not open the oven for any reason.
AFter one hour, remove the chicken and let rest for 10 minutes.
Remove the lemon, garlic and herbs and add them to the drippings in the pan.
Remove the chicken to a cutting board or plate.
Pull or cut the chicken into pieces and arrange on a platter. If any pieces are not done, finish them for one-minute in the micro-wave.
Drizzle the drippings, lemon, garlic and herbs from the pan over the chicken, and serve.

Notes from France:
I've made roast chicken a few times here.   First, I choose a lovely yellow chicken from the market (poulet jaune).  Strangely, chicken is not common here.  The local people each ducks and geese.   I found some preserved lemons in the Narbonne market (non-bottled) and used a few slices in the chicken stuffing.   Also, local purple garlic.   For herbs, I used sage and rosemary from the back garden here.   Also, a nice sprinkling of herbs de provence over a thick coating of local olive oil.   All from the Saint Pierre or Narbonne markets.

Really Easy Turkey Dinner with Herb Stuffing and Cranberry Sauce with Ginger, Oranges, and Spices

I have a half a turkey left from last December --- it needs to be eaten and the students want to experience a Canadian turkey dinner. It's a real organic turkey from a real butcher. I had a small turkey cut in half , cooked one half and froze the other half.

I really like doing a half turkey because, besides being more suitable for a small household, it only takes 1-1/2 hours to cook, the outside is golden and crisp and, because the cooking time is short, the breast meat stays juicy.

You can't stuff a half turkey which does make a difference to the taste of the stuffing and the turkey, but baking it as a side dish is easier and safer. Another problem is getting enough giblets to make gravy, but then again, we don't need gravy in the hot weather.

Every family has it's own traditions and turkey dinner evokes memories of simpler days. Many people like to keep it turkey and trimmings as simple as possible. I like it simple too --- the less work the better and because my kitchen is so tiny. I go as far as I can with butter, salt and pepper and fresh herbs. But I balk at opening cans or using mixes.

Don't bother making a turkey dinner if you consider it a burden. I actually find it quite an easy dinner to make if you are very organized.

The big payoff is at least 3 days of delicious leftovers and no cooking. I am not a fan of turkey soup or recipes made of leftover turkey. I just heat up the leftovers with a fresh salad.

There are as many stuffing recipes as cooks, but my motto is that the cook chooses what to cook and the ingredients. Make your favourite stuffing recipe.


As to the cranberry sauce, I am indifferent to the canned variety but often make my homemade sauce throughout the year. We love it on bread, yogurt, ice cream, oatmeal, and as a side dish with any meat.

Serving ideas:

Serve the turkey with your favourite red wine.
Roasted yam salad with garlic and tomatoes
Green salad
Brussels sprouts
Mashed potatoes with Giblet gravy Or Potato Salad with Sundried Tomatoes
Start with pro secco and Greek olives, pecans, local goat or sheep cheese or real Roquefort with a French baguette.
End with pumpkin pie with whipped cream or ice cream, a dessert wine and a cheese board again.

Really Easy Turkey Dinner --- the recipes

Herb Stuffing

1 loaf French bread, 2 days old, made into crumbs in the food processer (This is about the only time of the year the food processer comes out of the pantry.)

1/4 pound butter, melted

3 eggs

1 c. broth

1 small bunch chopped flat leaf parsley

1 small bunch chopped fresh sage leaves

1 t. anise seeds

1 finely chopped onion

Mix well and put into 1 or 2 greased casserole dishes.

Bake at 300 degrees f. for one hour.


Roast Half Turkey

Take the half turkey out of the frig 30 minutes in advance to bring it to room temperature. Rinse the turkey well. Pat dry.

Put the half turkey cut side down on a rack (if you have one) in a large roasting pan.

Put the oven rack in the middle of the oven.

Preheat the oven to 450 degrees F. for 20 minutes.

Drizzle olive oil generously on the turkey skin and season the exterior generously with sea salt and freshly ground pepper.

Put the turkey into the oven uncovered for 30 minutes. After 30 minutes, the skin will be brown and crisp.

Turn the oven down to 300 degrees F. and cook uncovered for another 60 minutes.

Position 2 oven racks, one to accommodate the casseroles full of stuffing and one for the turkey.

Take the turkey out and cut into the leg joint to test for doneness. If still a little pink, put back for 10 minutes.

When done, take the turkey out and let stand while you make the vegetables.

Remove the stuffing and spoon the juices from the turkey pan into the stuffing or if you are going to make gravy, leave them in the pan and make the gravy in the pan on top of the stove.

Put the turkey onto a large platter or bread board and cut off the leg and wing. Pull the leg, thigh, wing and other dark meat off the bones, pull or cut it into smaller pieces leaving skin in place if possible, and place it one half of a smaller serving platter. Slice the breast with skin intact if possible and lay the slices on the other half of the serving platter. Save all the bones.

After dinner, pull all the rest of the meat off the carcass and store all leftover turkey meat in the frig for lunches and dinners.

Place the carcass and bones in a large pot of water. Simmer for 2 hours. Take all the bones out and discard. Pour the stock into small glass jars and freeze (leave 1/2" at the top of each jar to allow for the frozen broth to expand). Label with type of broth and date (e.g. "TURK 6/09"). Use in recipes where chicken broth is called for. Now you don't have to buy canned broth, boullion cubes or anything like that.

Cranberry Sauce With Spices, Orange and Ginger
2 packages frozen cranberries

Water to cover

3 c. sugar

1 large whole orange, cut into 1/2 chunks including all pith and peel. Discard any seeds.

1 t. ground ginger or 1 T. grated fresh ginger

dash each ground cinnamon, ground cloves, ground cardamon (optional)

Simmer the sauce, watching closely, until the cranberries are cooked, about 2 hours. Add water if necessary.

Cool and store in 2 2-quart sealer jars. Store one in the frig to use on bread and as a side dish with meats. Whole cranberries are incredibly healthy so eating the sauce daily is not a bad idea. If you don't eat sugar in anything else (e.g. no processed food, no canned food, no boxed cereals, no baked goods, no fast food), a little sugar in your sauce won't make a big impact on your health. Freeze 1 jar for the next turkey dinner.


Saturday, May 30, 2009

Mara's Mami Hedy's Aelplermakkronen

Aelplermakkronen --- the talk
Tamara made this old Swiss recipe for all of us last week. It is traditionally made by people living high in the Alps (Aelpler means person living in the Alps). My advice is to make it when you have lots of hungry young people around, who can burn off the calories. It is addictive. Serve with an ice cold white from Oyster Bay.


Aelplermakkronen (für 4 Personen) --- the recipe

200 gr. Makkronen ( 1-3/4 c. penne pasta, partly cooked in salted water)
4 Kartoffeln beides in Salzwasser weich kochen (4 large potatoes, cubed and partly cooked in salted water)
200 gr. Speckwürfeli in der Bratpfanne anbraten (4-6 slices (7 oz.) bacon , cut in small pieces and sauted lightly)
400 gr. Greyerzerkäse raffeln (3-1/3 c. grated Swiss cheese)
alle vier Zutaten lagenweise in eine Gratinform legen (spread out in layers in a 9" x 13" baking dish)
2.5 dl. Halbrahm mit Bouillon erwärmen und darüber giessen (1 c. cream mixed with 1/4 c. bouillon, warm and pour over the layers)
4 Zwiebeln in Ringe schneiden, goldbraun dünsten und über die Masse verteilen (4 onions, sliced and fried until almost carmelized, spread over the top)
Eine halbe Stunde bei ca. 150 Grad im Backofen gratinieren (bake covered for 30 minutes at 300 degrees F)
Dazu kann Apfelmus serviert werden (serve with apple sauce)

Conversion Tips:
1. For converting European recipes using weight measures to North American volume measures (e.g. grams and liters to cups and teaspoons), use this website (another tip from Loris). http://www.convert-me.com/en/convert/cooking#subs

2. dl. means decaliters
1 deciliter = 1/10 liter = 100 milliliters = 3.4 fluid ounces
10 deciliters = 1 liter

Patrick's Rustic Citrus and Dried Apricot Marmalade

After reading many marmalade recipes that involved multiple steps, hours of work and loads of equipment, I decided to make my own shortcut version, rustic marmalade so to speak. The ingredients were inspired by my great friend Patrick, a real chef, who has given me many cooking lessons. This marmalade is incredibly delicious and doesn't last long here.

Patrick recommends a medley of various citrus fruits, oranges, lemons, limes and grapefruits, whatever is around the house, plus Turkish dried apricots (the soft kind). I only had oranges and lemons the first time I made this so that's what I used.

The pectin for gelling comes from the orange peel and the seeds, but I found it gelled beautifully without the seeds.

Most recipes emphasize that the cooked citrus fruit be cooled to room temperature before adding sugar. I am not sure why this step is important. Does anyone know?

When choosing oranges, use the large navel oranges and choose ones with thick skin and pith.

Patrick's Rustic Citrus and Dried Apricot Marmalade

Ingredients:
4 large oranges, chopped with all the pith, peel and juice, seeds removed
1 whole lemon, chopped with all the pith, peel and juice, seeds removed
1/2 cup chopped dried apricots
2-1/2 cups sugar

Instructions:
Put all the chopped fruit, plus water to cover (plus a bit more) into a large pot.
Simmer 2 hours or until the fruit is soft. Watch carefully and stir every so often. Add water if needed.
Cool to room temperature. Add the 2-1/2 cups sugar.
Simmer another 30 minutes, watching carefully to make sure it does not burn.
Cool and store in glass sealer jar in the frig.

It will be thick and chunky and very dark orange.

Goes with:
Homemade Yogurt
Brown Bread
Ice cream
Roast pork

Nancye's Citrusy Granola


This is the freshest, tastiest, easiest and healthiest granola I've ever eaten. We just can't eat the boxed processed cereal in this house anymore --- they taste stale as well as too sweet and salty.

I am always looking for ways to incorporate small nuts, seeds, and dried fruits into our daily diet without adding too much fat and sugar and this is one of the best.

I tried this recipe without any sweeteners and we didn't miss it a bit. The citrus fruits make this recipe unique. We eat it for dessert with yogurt too.

Did you know cinnamon lowers blood glucose and cholesterol, fights cancer, and helps brain health and relieves arthritis. You probably need about 1/2 tsp. a day but this is a start. I put 2 tsp. in this recipe without it being too much.


Nancye's Citrusy Granola

Ingredients:

4 cups oatmeal flakes (or other flakes)


1/2 cup wheat germ (optional)

1 cup chopped nuts (almonds, walnuts, hazelnuts)

1/2 cup seeds (pumpkin, sunflower, poppy, sesame)

2 cup finely chopped dried fruit (raisins, dates, apricots, cranberries)

1 tsp. cinnamon
Juice and zest of 1 whole orange

Juice and zest of 1 whole lemon

1/2 cup honey and 1/2 cup brown sugar (optional).

Instructions:

Put the ingredients into a large bowl and stir well.

Spread out on an oiled baking sheet or large metal roasting pan. (I used aluminum foil instead of oil.)

Toast at 300 degrees F. for 30 minutes.
Store in a glass sealer jar. Best within 2 weeks.

Variations: Add shredded coconut; Use maple syrup for part of the sweetener; Add a 1/4 tsp. cardamon or nutmeg.

Goes well with: Yogurt, Milk, Ice cream, Banana

Rhubarb Orange Ginger Sauce

Rhubarb Orange Ginger Sauce

The best fruits for baking and cooking are sour fruits or fruits with tart or sour skin, such as rhubarb, plums, grapes, cranberries and sour cherries. Rhubarb makes the best pie and plauts (streusel cake).

Rhubarb is one of my favourite "fruits" and I really look forward to pulling the first stalks every spring. Rhubarb and sorrel are the first harvest from my garden in early spring. If you have a small garden, I recommend planting a rhubarb and a sorrel plant. They are perrenials and come up every year. More on sorrel in future posts.

To pull rhubarb, just pull gently on the stocks. I am told some types of rhubarb require cutting, but mine can just be pulled. I cut the leaves off while still in the garden. Always leave at least 4 stocks as the leaves are needed by the plant to grow more stocks. Red stalks looking are nice but green or red ones both taste good.

You can freeze rhubarb but I haven't tried it yet. Does anyone have tips?

My students from Asia, Latin America, and Europe are not familiar with rhubarb but love this all purpose rhubarb sauce.

Rhubarb Orange Ginger Sauce

Ingredients:
  • 6 c. rhubarb, chopped
  • Water
  • 1 1/2 c. sugar
  • 1 whole orange
  • Fresh ginger
Instructions:
  1. Pull 6 to 8 stocks of rhubarb. Cut off the leaves and discard (do not eat).
  2. Wash the stalks in water.
  3. Roughly chop the rhubarb into 1/2" pieces to make 5 - 6 cups.
  4. Put rhubarb in a pot with 1/2 c. water.
  5. Wash a large orange with a thick pith. The majority of the nutrients in an orange are in the pith and peel. The pith contains high levels of flavenoids and anti-cancer agents. When I eat an orange I always remove only the peel, leaving the pith, which I find delicious.
  6. Chop the orange into 1/2" pieces, including the peel and pith. Save the juice and add the juice and chopped orange to the pot.
  7. Add 1 1/2 c. sugar.
  8. Add 1-2 T. fresh grated ginger.
  9. Simmer until the sauce is thick and the rhubarb and orange are cooked. Watch the pot so it doesn't burn. Adjust water and sugar as necessary.
  10. Store in a glass sealer jar in the frig.
Serving:

We eat rhubarb sauce as follows:
  • On Perfect Wholewheat Bread
  • With yogurt
  • With ice cream
  • As a side dish with meats

Friday, May 29, 2009

Perfect Kneadless Bread

Perfect Kneadless Bread

The slow rise or no-knead bread method is an old French technique that lost favour when bakers started using machines to mix and knead dough and wanted to speed the process. I wish I knew more about its history. Perhaps some of you will share some stories.

No-knead bread is so easy a child can make it. It tastes much better than any artisan bakery bread, breadmaker bread, or kneaded bread because the gluten has time to develop into the most wonderful taste and texture.

The slow rise method is currently enjoying a resurgence of popularity with home cooks and there are many methods and recipes. After a lot of experimentation, I created this recipe because:
  • it has the least number of steps and each step takes only a couple of minutes
  • it involves least number of times I need to be there to do something (4 times)
  • takes the least effort (no kneading or beating)
  • it can be made using a bowl, a spoon (or hands), measuring cups and spoons, and two bread pans, in other words no special equipment and minimal clean up time
  • it uses the least number of ingredients, only flour, water, salt, and yeast
  • it contains wholewheat which I love
  • it contains no fat or sugar or dairy products to keep things simple.
I use Rogers whole wheat flour, rye flour, and unbleached white flour (no additives).


Here's the recipe for two loaves of Perfect Kneadless Brown Bread. Start around lunch time one day and have warm bread for lunch the next day.  If you are out of the house all day, start at dinner time and bake the next evening. Please let us all know what results you get.
You'll find the instructions for Kneadless Multigrain, Kneadless Rye, Kneadless Walnut, and Kneadless Ciabatta following the Brown Bread recipe.

Perfect Kneadless Brown Bread

Dry Ingredients:
In a large pottery bowl, measure out the following:
  • 2 cups unbleached white flour (For beginners: Do not sift or tamp the flour. Use a stainless steel measuring cup made for dry ingredients. Use the edge of a table knife to level the flour.)
  • 4 cups whole wheat flour
  • 1 cup wheat bran (If making Kneadless Multigrain or Kneadless Walnut Bread, leave this out.)
  • 1/2 tsp. yeast (instant or breadmaker)
  • 2-1/2 tsp. salt (Put the salt in a different place in the bowl from the yeast because dumping it on top of the yeast will kill the yeast. Once mixed with the flour it won't be a problem.)


Mix well with a spoon.


Wet Ingredients:
Add 3-1/4 cups of cold water measured in a measuring cup made for liquids (e.g. pyrex or glass measuring cup). Warm or room temperature water works as well, but cold water is best as it slows the yeast action and allows flour enzymes to work.


Stir with a metal spoon to minimize sticking, just until the dry ingredients are incorporated (less than 60 seconds). Hands are okay too.

You just have to stir enough to more or less get all the dry ingredients wet, no more.  The dough will be very sticky and look like this.  


Cold rest (optional):
Cover the bowl with a clean tea towel and put it in the frig for 3 hours. This step is optional but it does noticeably improve the texture (more holes) and it rises higher. During the cold rest, the yeast is not active but the enzymes in the flour do their magic. You can use the cold rest to adjust the timing to suit your schedule, but don't leave the dough in the frig for more than 10 hours.   I usually skip the cold rest.


First rise:
If you use the cold rest, take the dough out of the frig. 
Put the bowl, covered with a clean towel,  in a quiet place at room temperature (cooler is better than warmer) and leave it undisturbed for 12 to 18 hours. The dough will approximately double in size. You can peek but generally don't bump or move the bowl too much. The house will smell very yeasty and wonderful.


This is what the dough looks like after the first rise.


Second rise:
Place two standard metal or glass (5 " x 9") bread pans nearby (not non-stick pans). Oil the pans generously using olive oil, bacon fat, or lard. Oil your hands lightly.
Using a clean metal spoon to minimize stickiness, work around the edge of the dough to loosen it from the sides and bottom of the bowl. It will collapse as you do this. The dough will be very sticky and elastic.
Add-ins: At this point, add the proofed grains or walnuts for Kneadless Multigrain Bread or Kneadless Walnut Bread (see recipes below). Fold them in by tucking the bread with your hands under itself over and over until the add-ins are well distributed.


As the dough comes away from the bowl, pick it up in your hands, and pinch it into two equal pieces. Put one back in the bowl and keep the other one in your hands. Don't worry if they don't seem exactly equal in size.  This step is pretty messy, as the dough is sticky, but it will work out fine no matter what you do.


With your hands, tuck the dough under itself so the top is smooth.


Make a longish shape and put it into the first bread pan. Do the same with the other piece of dough. Don't worry if they don't look equal in size, but you can pinch off a piece from one and add it to the other one using the tucking under method.

Cover the pans with a clean tea towel and leave undisturbed for 3 hours. The dough will rise again to double in size. You can peek but don't bump or move the pans too much.


Baking:
20 minutes before you are going bake, turn the oven to 425 degrees F. Put the rack in the middle of the oven and don't open the oven while it is heating.
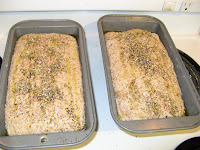


After the second rise, drizzle olive oil generously on the dough. Sprinkle generously with zatar.  This step is optional.

This is how the dough looks after the second rise and after the oil and zatar have been added.


Put the pans in the oven keeping the oven open for as little time as possible. The pans should be in the middle of the oven but not touch each other. Bake for exactly 45 minutes. Do not open the oven for any reason. The house will fill with the smell of bread, sesame, and thyme.


Using oven mitts, remove the bread from the oven. The loaves will not rise above the pan and they will seem overbaked, but fear not.


Tap or bang the pans on the stove top or counter hard enough to loosen the bread from the pan. Using the oven mitts, turn the bread out of the pans onto racks to cool. If you don't have racks, just prop one end up on something so the bottom can cool. You'll know the bread is done if tapping the bottom makes a hollow sound. But don't worry, the bread will be done.


Topping Notes:
The students and I like a topping. Our favourite is zatar but you can be creative. Anise seeds are very nice especially with honey on the bread.

Spice Blends - Zatar:
This is a traditional Turkish blend, used for everything.  Mix equal parts of sumac, thyme, and sesame seeds.  Mix with oil for spreading on bread or on chicken to be roasted.  Sumac is available in Greek grocery stores and has a lovely lemony flavour and a dark red colour.


Slicing and Eating:
If you absolutely must, you can slice the bread while hot or warm using a serrated knife and turning the bread on its narrow edge.
The students and I eat it many ways:
Plain, toasted or for sandwiches
With unsalted butter
With unsalted butter and honey (Mie's favourite)
With Bothwell squeaky cheese (squeaky cheese is mild fresh cheddar no more than 7 days old. Mild regular and old versions are available at Safeway, but the really fresh cheese seems to be available only in Steinbach) http://www.bothwellcheese.com/ (Loris' favourite)
With Brie, a thick slice of juicy beefstake tomato, sea salt and freshly ground pepper
With rhubarb orange ginger sauce
To round out a soup or salad meal
With oily tuna or sardines, salt and pepper
With homemade cottage cheese and a few oven dried tomatoes


Storage Notes:
Leave the loaf out on the bread board cut side down, or wrap it in paper or cloth. It will keep this way for 2 days, but it will usually be gone and you will have to start a new batch anyway.
If you put it in a plastic bag it will get moldy faster, and the crust will soften.
If you refrigerate it, the taste will change and it will get stale.
You can freeze it in an air tight plastic bag for up to 2 months.  If I am alone in the house, I freeze half loaves, and take them out of the freezer as I need them.
Variations:
Kneadless Multigrain or Seed Bread
This bread is very moist and soft and has a lovely texture and taste.
Follow instructions for Kneadless Brown Bread above.

Leave out the wheat bran when starting the Kneadless Brown Bread, but keep the other ingredients the same.
One hour before starting the second rise, put 1/3 cup each of whole millet, quinoa, and amaranth, in a bowl of water to proof. 
Just before shaping the loaves, drain the proofed grains, and mix them into the dough, using your hands and the folding under method until the grain seems fairly well distributed.  The dough will get quite wet, but it won't matter.
Then shape the loaves and let them rise in the pans.

Kneadless Walnut Bread
This bread changes and enhances the taste of the wholewheat.

Follow instructions for Kneadless Brown Bread.
Leave out the wheat bran when starting the Kneadless Brown Bread, but keep the other ingredients the same.
Chop one cup of walnuts finely.
Just before the second rise, mix the nuts into the dough using your hands and the folding under method until the nuts are well distributed.
Then shape the loaves and let them rise in the pans.
Kneadless Rye Bread
This is a wonderful bread, which I make as often as the Kneadless Brown Bread.
Follow instructions for Kneadless Brown Bread but use the following ingredients.
1-1/2 cups dark rye flour
4 1/2 cups unbleached white flour
3 tsp. salt
2/3 tsp. instant or breadmaker yeast
3 Tbsp. caraway seeds (be sure to get a good brand of fresh ones).
3 cups water
Kneadless Ciabatta
This bread is incredibly tasty and has a wonderful holey texture. Ciabatta means slipper in Italian.
4 cups unbleached white flour
1-1/2 tsp. salt
1/4 tsp. yeast (instant or bread maker)
Mix the dry ingredients well.
2 cups water.
Stir in the water. Cover with a tea towel and leave at room temperature for 18 hours.
Put some wheat bran or cornmeal on a heavy baking sheet to prevent sticking.
Turn the dough out onto the sheet and shape with hands --- pull and pat until it's almost as long as the sheet. The loaf will spread sideways on its own to make that big slipper shape.
Cover with a clean cloth and let rise 2 hours.
Preheat oven to 425 degrees F. for 20 minutes.
Bake at 425 degrees F. for 35 minutes.
Remove from the oven and set on rack to cool. The crust will be hard enough to easily pick up the whole loaf.
If you can't wait to eat some, it is easier to slice if you turn it on its narrow edge.